You plug an Arduino into a USB cable, hit Upload in the IDE, and a few seconds later your sketch is running. No external programmer, no ribbon cables clipped onto tiny header pins, no AVR Studio. That whole experience, the thing that makes Arduino beginner-friendly in the first place, hinges on one tiny piece of code living inside the microcontroller: the bootloader.
This guide covers what a bootloader actually is, how it works on Arduino boards, why every Arduino needs one, the trade-offs involved, and what changes on newer boards like the Uno R4. I’ve pulled from official Arduino documentation, the ATmega328P datasheet, the Optiboot source code, and hands-on experience with the Burn Bootloader flow, and cut every bit of fluff so you only get what’s useful.
What Is a Bootloader on a Microcontroller? (Quick Answer)
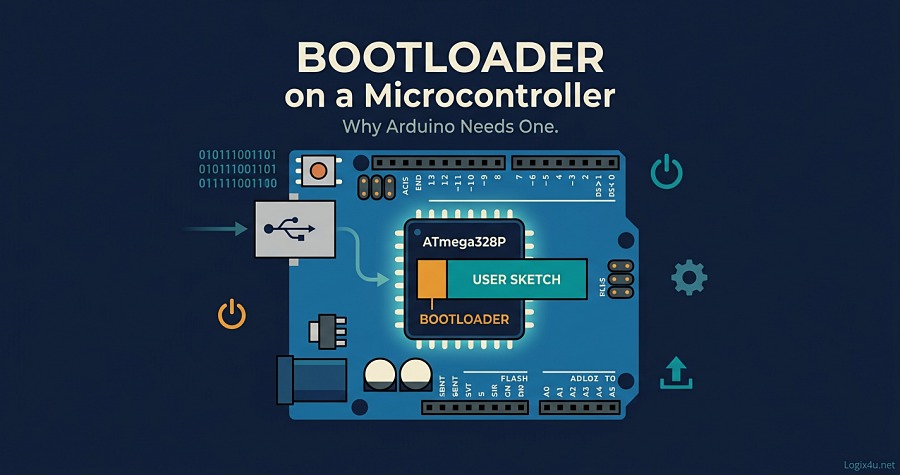
A bootloader is a small piece of firmware stored in a protected section of a microcontroller’s flash memory. It runs first on every power-on or reset. On Arduino, the bootloader briefly listens for a new program over the serial port, flashes that program into memory if one arrives, and otherwise hands control over to whatever sketch was last uploaded. It’s what lets you program an Arduino over USB without any external hardware programmer.
Quick-Glance Summary Table
| Topic | Short Answer |
|---|---|
| What it is | A small firmware routine that runs first on reset/power-up |
| Where it lives | A protected “boot section” of flash memory on the MCU |
| Size on Arduino Uno | 0.5 KB (Optiboot); 32 KB total flash on ATmega328P |
| Main job | Let you upload new sketches over USB/serial |
| Communication | UART using the STK500 protocol; Arduino IDE uses avrdude |
| Trigger | Checks for incoming data on reset; times out in ~1-2 seconds |
| Without it | You’d need an AVR-ISP, USBasp, or similar programmer over ICSP |
| Cost | Tiny delay on startup + small chunk of flash |
Bootloader in Simple Terms (the BIOS Analogy)
If you’ve ever watched a PC start up, you’ve seen the BIOS (or UEFI) flash its logo and initialize hardware before handing off to Windows or Linux. An Arduino bootloader plays the exact same role, just at a much smaller scale. It’s the first thing the chip runs, and it decides whether to accept a fresh program or launch the existing one.
The comparison holds up well because both BIOS and the Arduino bootloader share three traits: they live in a protected memory region, they run first, and they hand off to the “real” program after a short window. The BIOS firmware concept on a PC does the same boot sequencing a bootloader does on a microcontroller, just with more layers between hardware and software.
Why Does Arduino Need a Bootloader?
Without a bootloader, programming an Arduino would look a lot like programming a bare AVR chip in a lab: you’d need a dedicated hardware programmer (AVR-ISP, USBasp, USBtinyISP, or an Atmel-ICE), a 6-pin ICSP cable, the right drivers, and an understanding of fuse bits before you could upload a single LED blink sketch.
The bootloader replaces every bit of that with a USB cable.
Here’s what the bootloader unlocks, in plain terms:
- Plug-and-play programming. You connect a USB cable and press Upload. The IDE handles the handshake, the auto-reset, and the flash write. You don’t need to know any of it to use it.
- No external programmer. Anyone with a laptop and a USB cable can flash firmware. That’s the whole reason Arduino blew up in education and hobby projects.
- Recoverability. If your sketch crashes or hangs, the bootloader still runs on reset, so you can upload a fresh sketch and recover the board. Without a bootloader, a bad sketch can feel a lot more permanent.
- Field updates. A shipping product with a bootloader can accept firmware updates over its existing serial port or USB. You don’t need to send the customer a programmer.
On the flip side, the bootloader costs you a small amount of flash (on the Arduino Uno, 512 bytes of the 32 KB total) and adds a brief delay on startup. For hobby projects that trade is almost always worth it. For production hardware with tight flash budgets, some engineers remove it.
Where the Bootloader Lives: Flash Memory on the ATmega328P
The Arduino Uno’s ATmega328P has three kinds of memory: 32 KB of flash (for program code), 2 KB of SRAM (for runtime data), and 1 KB of EEPROM (for small persistent data). The bootloader sits inside flash, in a specific region called the boot flash section.
On AVR chips, the boot section size is configurable through fuse bits. The ATmega328P datasheet lets you choose 256, 512, 1024, or 2048 words (512 bytes to 4 KB). The modern Arduino Uno uses Optiboot, which occupies just 256 words, or 512 bytes. That’s why you’ll see Arduino Uno specs list “32 KB flash of which 0.5 KB used by bootloader,” leaving 31.5 KB for your sketch.
A setting called the Boot Reset Fuse (BOOTRST) tells the chip: on reset, don’t jump to address 0x0000 like normal; jump to the start of the boot section instead. That’s the key mechanism. Power up a chip with the boot reset fuse programmed, and the bootloader runs before your sketch ever sees a single instruction.
How the Arduino Bootloader Works (Step by Step)
The Optiboot source code makes this pretty easy to follow. Here’s what actually happens from the moment power hits the board until your sketch runs.
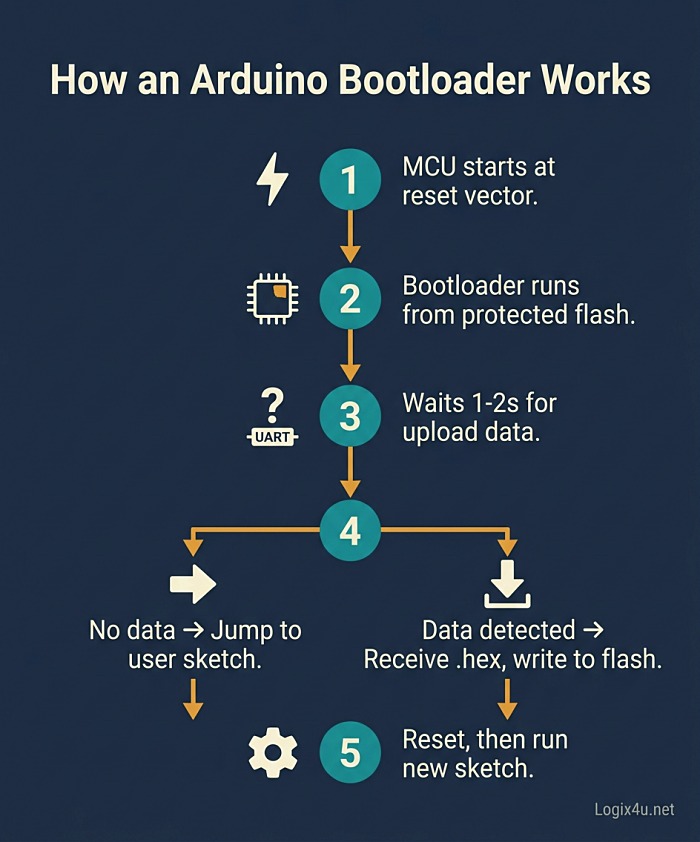
- Power-on or reset. Whether you plug in USB, press the reset button, or receive a reset signal from the IDE, the MCU restarts. The boot reset fuse sends execution to the bootloader’s start address instead of the usual
0x0000. - Boot section runs. The bootloader initializes the minimum peripherals it needs: the UART for serial communication and a watchdog timer as a safety net.
- Reset source check. Optiboot reads the MCU Status Register (MCUSR) to see why the chip reset. If it’s a power-on or brown-out, it can jump straight to the user sketch. If it’s an external reset (the IDE triggered it via DTR/RTS), the bootloader prepares to receive new code.
- Listen on UART. The bootloader watches the serial port for a specific handshake from avrdude running on your PC. It waits about 1 to 2 seconds (Optiboot uses a watchdog-based timeout).
- Two paths. If no data arrives, the bootloader times out and jumps to the user sketch at address
0x0000(or wherever the reset vector lands). If data does arrive, it begins programming mode. - Receive the .hex file. The Arduino IDE’s avrdude tool sends the compiled sketch over serial using the STK500 protocol (originally a Microchip/Atmel programming specification). The bootloader writes the incoming bytes into flash, one memory page at a time, using the AVR’s Self-Programming Mechanism (SPM) instruction.
- Verify and jump. After the whole sketch is written, avrdude can read the flash back and verify it matches. The MCU then resets (or directly jumps), and control transfers to your sketch.
Self-Programming Mechanism (SPM): the Trick That Makes It Possible
Worth pausing on this one. How does a program running from flash memory rewrite flash memory? AVR chips provide a Self-Programming Mechanism, a special SPM instruction that only executes inside the boot section. That’s why the bootloader has to live in the boot section. Code anywhere else on the chip can’t write to flash, but code running inside the boot section can. This is also why the bootloader can’t overwrite itself by accident: the boot lock bits can prevent writes to its own region.
The Optiboot Bootloader: What Ships on Modern Arduino Uno Boards
Not every Arduino bootloader is the same. The original Arduino bootloader from the Diecimila era was around 2 KB and ran at 57600 baud. Starting with the Uno, Arduino switched to Optiboot, a much smaller and faster replacement.
Optiboot’s main advantages, taken straight from the Optiboot project repository:
- 512 bytes total size, freeing up roughly 1.5 KB of extra flash for your sketch compared to older bootloaders.
- Higher baud rate (115200), which roughly doubles upload speed versus the 57600 of the older bootloader.
- Faster start-up thanks to a feature Optiboot calls “fastboot,” which reduces the delay before your sketch runs.
- Watchdog-based timeout, more reliable than older timing loops.
In practice, if you buy a new Arduino Uno or an official Nano from 2026, it’s running Optiboot. Some cheap clones still ship with the older “ATmega328P (Old Bootloader)” image, which is why the Arduino IDE has a separate board entry for it. If your uploads fail on a clone, switching to the “Old Bootloader” variant in Tools > Processor is usually the fix.
With Bootloader vs. Without Bootloader
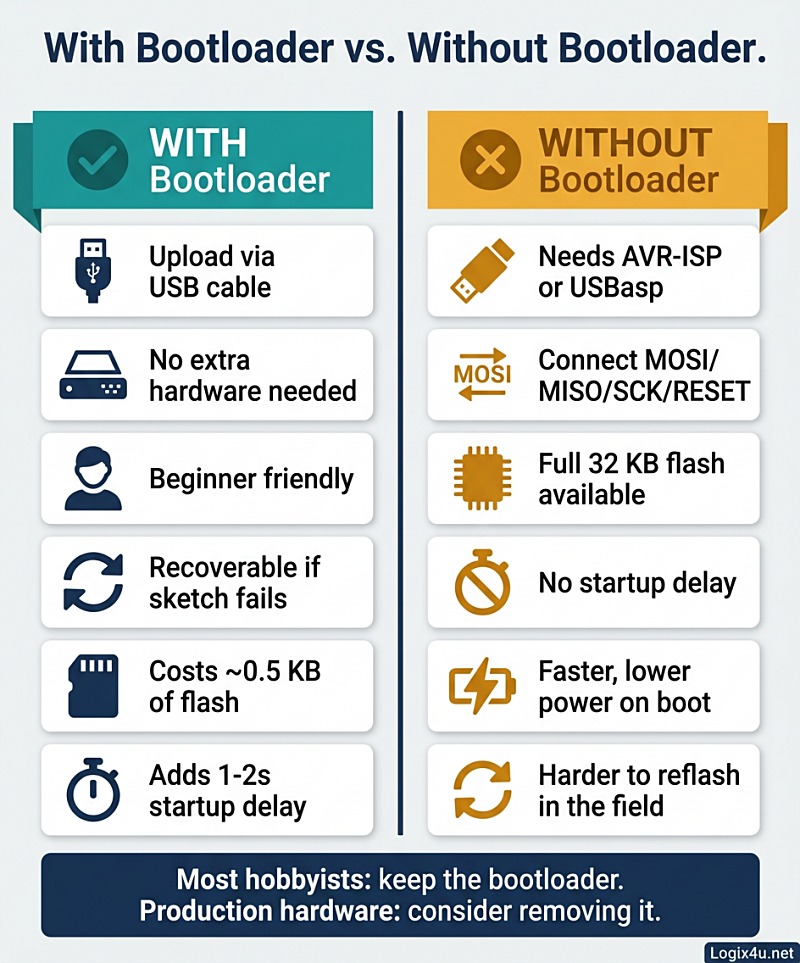
A fair question: do you even need the bootloader once your project is done? Short answer, for most hobby projects, yes. For some production scenarios, no. Here’s the trade.
With the bootloader installed
- Upload sketches over USB, no extra hardware
- Survives most coding mistakes (you can always reflash)
- Easy field updates if you expose a serial port
- Costs ~0.5 KB of flash
- Adds 1-2 seconds of startup delay
- Uses a small amount of extra power during the boot wait
Without the bootloader
- You need an AVR-ISP, USBasp, USBtinyISP, or another Arduino running the “Arduino as ISP” sketch
- You connect through the ICSP header (MOSI, MISO, SCK, RESET, Vcc, GND)
- You get the full 32 KB of flash on the ATmega328P
- The MCU boots instantly into your code (good for battery-powered projects that need fast wake)
- Much harder to reprogram in the field
Rule of thumb: keep the bootloader for development, prototypes, kits, and anything that might need updating. Remove it for very low-power designs, flash-constrained projects, or shipping products where OTA updates are handled a different way.
How the Arduino IDE Actually Talks to the Bootloader
A lot of the “magic” of pressing Upload comes from three pieces of software working together.
- Arduino IDE. Compiles your sketch into an Intel HEX file (the
.hexfile you’d find in the build folder). - avrdude. A command-line tool the IDE calls behind the scenes. It handles the actual upload, using a chosen programmer protocol.
- The bootloader on the chip. Listens for avrdude’s commands and writes the received bytes to flash.
The IDE also triggers an auto-reset right before uploading. When you open the serial port at upload time, the USB-to-serial chip (an ATmega16U2 on the Uno, or a CH340 on most clones) pulses the reset line via DTR/RTS. That reset fires the bootloader at exactly the right moment, so it’s listening when avrdude starts sending bytes. This is why you sometimes see clone boards with a 10 µF capacitor between RESET and GND: it disables auto-reset, and you have to press the physical reset button manually at upload time.
Bootloaders Across Different Arduino Boards
Not every Arduino uses the same bootloader design. Here’s a rundown.
| Arduino board | MCU | Bootloader type | Flash / bootloader size |
|---|---|---|---|
| Uno R3, Nano | ATmega328P | Optiboot (serial, STK500) | 32 KB / 0.5 KB |
| Mega 2560 | ATmega2560 | STK500v2 variant | 256 KB / 8 KB |
| Leonardo, Micro, Pro Micro | ATmega32U4 | Caterina (USB DFU-like) | 32 KB / 4 KB |
| Uno R4 Minima / WiFi | Renesas RA4M1 (Cortex-M4) | Renesas bootloader + SAMD-style DFU | 256 KB / varies |
| MKR, Zero, Nano 33 IoT | SAMD21/SAMD51 (ARM) | UF2 or SAM-BA bootloader | 256 KB+ |
| ESP8266, ESP32 variants | Xtensa / RISC-V | Custom ROM bootloader + OTA | Several MB |
A few things worth calling out:
- The Leonardo and 32U4 boards use a USB bootloader called Caterina. The chip itself does USB natively, so there’s no separate USB-to-serial converter. The downside: the bootloader is larger (around 4 KB) because it implements USB.
- The Uno R4, released in 2023, is a completely different architecture. It uses a Renesas RA4M1 (ARM Cortex-M4 at 48 MHz, 256 KB flash). The bootloader is a DFU-style loader that shows up as a USB device when you double-tap reset, similar to how SAMD-based boards behave.
- ESP32 and ESP8266 have a ROM-based bootloader baked in by the silicon vendor, plus a secondary bootloader that Arduino-core firmware lives on top of. They also natively support OTA (over-the-air) updates over WiFi, which is a whole different category of “bootloader.”
Why You Might Need to Burn (Reinstall) the Bootloader
A bootloader almost never “goes bad” on its own, but a few situations do require a fresh flash.
- You replaced the ATmega328P chip. A raw IC from a distributor ships blank. No bootloader, no board identity, nothing. You’ll need to burn one before the Arduino IDE can talk to it.
- You accidentally erased it. Uploading with an external programmer through the ICSP header overwrites the bootloader if your target address range overlaps with the boot section.
- You messed with the fuse bits. The Boot Reset Fuse or the clock source fuses got flipped, and now the chip won’t start properly. Reflashing via ISP with known-good fuse settings fixes it.
- You want a different bootloader. Switching an older clone to Optiboot for faster uploads, or installing a custom bootloader that supports encrypted firmware updates, both require a fresh burn.
- The board is a bricked clone. Cheap clones sometimes ship with misconfigured bootloaders or wrong fuse settings. Reflashing is the fastest fix.
What you need to burn a bootloader
- A working programmer: an AVR-ISP, USBasp, USBtinyISP, Atmel-ICE, or another Arduino running the “Arduino as ISP” sketch.
- A 6-pin ICSP ribbon cable or male-to-female jumper wires.
- The Arduino IDE (the Burn Bootloader menu item handles most of the work).
- For a bare ATmega328P on a breadboard: a 16 MHz crystal, two 22 pF ceramic capacitors, a 10 kΩ pull-up resistor on RESET, and 5 V power.
From there it’s mostly a Tools menu dance: select the right board, set the programmer to “Arduino as ISP” (or whatever programmer you’re using), and click Burn Bootloader. Arduino’s own walkthrough on this is covered in the Arduino Language Reference and SparkFun has a well-known hookup guide too.
Common Bootloader Mistakes to Avoid
These come up often enough in forum threads that they’re worth naming.
- Picking the wrong “Processor” variant. Modern Uno vs. “ATmega328P (Old Bootloader)” matters. Pick wrong and uploads time out.
- Forgetting to power the target board when using Arduino as ISP. Programmers like the Atmel MKII don’t supply power; you still need USB or external 5 V on the target.
- Selecting 5 V logic on a 3.3 V board. You can cook pins fast. If target is 3.3 V, use a logic-level converter.
- Connecting MISO to MISO vs. crossing the lines. Most ICSP cables are keyed so you can’t reverse them, but bare jumpers aren’t. Double-check pin 1.
- Skipping the capacitor trick on clone boards. If auto-reset works, you don’t need it. If your board doesn’t auto-reset (some CH340 clones misbehave), a 10 µF cap from RESET to GND handles it, but you have to remove it before uploading the next sketch.
Can You Write Your Own Arduino Bootloader?
Yes, and it’s a great learning project. The Optiboot source code is public (a few hundred lines of mostly C), well commented, and a small enough read to get through in an afternoon. The Optiboot GitHub repository is the canonical source.
If you want to go deeper, things you can customize:
- Communication interface. Instead of UART, a custom bootloader could read firmware from an SD card, EEPROM, I²C, SPI, or even a radio link.
- Security. Signed or encrypted firmware updates, with the bootloader rejecting unsigned binaries.
- Failsafe dual-image design. Store two copies of the firmware and only switch to the new one after a checksum passes, otherwise fall back to the old image. This is how mission-critical embedded systems survive power cuts during an update.
- Over-the-air updates. On WiFi-capable chips like ESP32, a bootloader can pull new firmware straight from a server. Arduino’s OTA library is built on exactly this pattern.
For anyone thinking of rolling their own, Microchip’s ATmega328P datasheet (especially the self-programming and boot-loader sections) is the primary reference. You can’t really skip reading it.
FAQs
What is a bootloader on a microcontroller in simple words?
It’s a tiny program stored on the chip that runs first when the microcontroller turns on. Its main job is to check if a new program is being uploaded. If one is, it writes it into memory. If not, it starts the program that’s already there.
Does every microcontroller have a bootloader?
No. Bootloaders are optional firmware. Many industrial microcontrollers ship blank and get programmed exclusively through an external programmer or a JTAG debugger. A bootloader is an added convenience, not a hardware requirement. Arduino boards ship with one because it’s what makes them beginner-friendly.
How big is the Arduino Uno bootloader?
The modern Arduino Uno uses Optiboot, which is 512 bytes (0.5 KB). Out of the ATmega328P’s 32 KB of flash, 31.5 KB is available for your sketch. Older bootloaders on pre-Uno boards were around 2 KB.
Can I use an Arduino without a bootloader?
Yes. You’d need an external programmer (AVR-ISP, USBasp, Atmel-ICE, or another Arduino running “Arduino as ISP”) and you’d upload sketches through the ICSP header using the programmer instead of the USB port. You also get back the 0.5 KB of flash the bootloader used.
What happens if the bootloader gets corrupted?
The board will stop accepting uploads over USB. The fix is to reflash the bootloader using an external programmer through the ICSP header. You don’t lose the chip, just the upload-over-USB convenience, and reflashing takes a couple of minutes.
Why does the Arduino have a delay when it boots up?
Because the bootloader waits briefly (1-2 seconds on Optiboot, up to 10 seconds on very old pre-Diecimila bootloaders) to see if the IDE is about to send a new sketch. If it doesn’t see any incoming data, it times out and runs your sketch. That wait is the bootloader doing its job.
Is the Arduino Uno R4 bootloader different from the R3?
Yes, completely. The R4 uses a Renesas RA4M1 ARM Cortex-M4 chip with a native USB interface, so its bootloader acts more like a DFU (Device Firmware Update) loader, similar to SAMD-based Arduino boards. The R3’s Optiboot bootloader uses UART over a separate USB-to-serial chip.
Does the Arduino Nano use the same bootloader as the Uno?
Modern official Arduino Nano boards use Optiboot, just like the Uno. Older Nanos and many clones ship with the older 2 KB bootloader and run at 57600 baud. That’s why the Arduino IDE shows two Nano processor variants: “ATmega328P” and “ATmega328P (Old Bootloader).”
Can a bootloader be used for over-the-air updates?
Absolutely, but mostly on microcontrollers with built-in wireless (ESP8266, ESP32, Nordic nRF, etc.). Classic AVR Arduinos can support OTA through custom bootloaders or bridge firmware, but it’s not a standard feature.
Key Takeaways
- A bootloader is a small firmware routine that runs first on reset and decides whether to accept a new program or launch the existing one.
- On Arduino Uno, the Optiboot bootloader takes 0.5 KB of the 32 KB flash and lets you upload sketches over USB with no extra hardware.
- Without a bootloader, you’d need an ICSP programmer and a 6-pin cable to flash the chip.
- The trade-off is a small flash cost and a 1-2 second startup delay, both of which are worth it for almost every hobby project.
- Different Arduino boards use different bootloaders: Optiboot on Uno/Nano, Caterina on Leonardo, DFU-style on the R4 and SAMD boards, ROM bootloaders on ESP32.
- You only need to burn a bootloader when you replace the chip, brick a clone, or want to switch bootloader types.
The bootloader is the quiet reason Arduino works the way you expect. Once you understand what it does, the rest of the upload pipeline (IDE, avrdude, auto-reset, STK500) starts to feel like one coherent system rather than a pile of magic. If you’re ever building your own ATmega328P circuit or trying to revive a dead clone, this is the first place to look.
Save this page for later. If you’re about to burn a bootloader for the first time, it’ll walk you through what’s actually happening on the chip.